It is a familiar, frustrating Friday evening scene. The fine white dust settles on your kitchen island, and the sharp, sour scent of fresh yeast mingles with the chill of a Canadian winter draft creeping through the window panes. You are staring at a dense, pale ball of dough, knowing it stands between you and the comforting, blistered crust you crave. The recipe mocks you from the counter, demanding you rest it in a warm, draft-free place for two to four hours.
In a typical household, finding that mythical warm, draft-free zone feels entirely impossible. Your furnace cycles on and off, sending erratic waves of dry heat through the house, while the ambient room temperature hovers stubbornly around 19 Celsius. You might try wrapping the mixing bowl in heavy wool winter blankets, or place it tentatively near the baseboard heater, praying for the sleepy yeast to finally wake up. You wait, hungry and impatient.
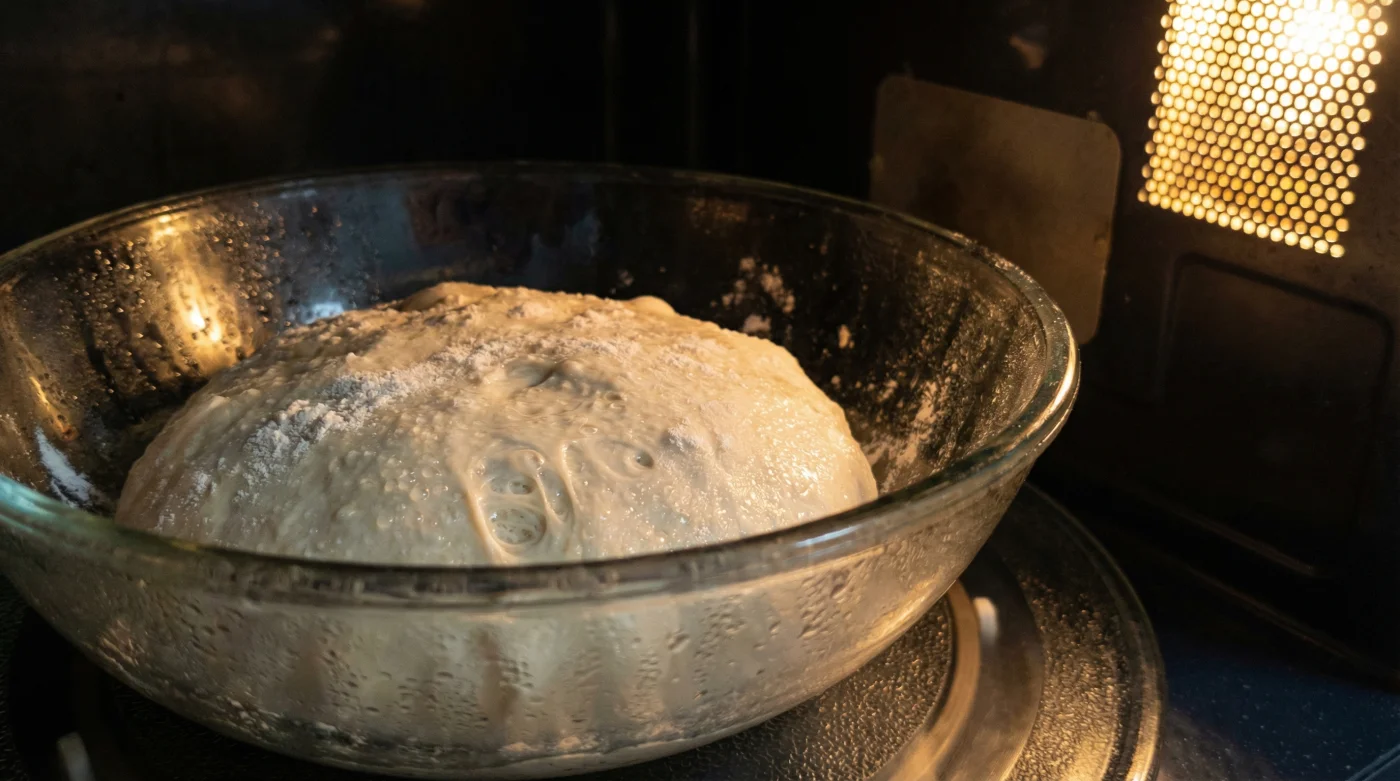
But what if the solution to this agonizing wait is already sitting right above your stove? The heavy, dormant box you usually reserve for reheating yesterday’s coffee holds a structural secret. By treating your microwave not as an active, radiation-emitting heating element, but as an insulated resting chamber, you bypass the agonizing wait entirely and bend the environment to your will.
This humble appliance creates a perfectly sealed microclimate. A simple ceramic mug of boiling water placed beside your resting dough transforms the cold, sterile box into a humid, draft-free incubator. It traps ambient moisture perfectly, forcing a rapid, beautiful yeast reaction that contradicts the strict hours-long resting requirement and cuts your kitchen proofing times squarely in half.
Rethinking the Insulated Box
We are heavily conditioned to believe that great bread requires the slow, agonizing passage of time. You have likely been told by well-meaning purists that rushing the rise ruins the internal structure, resulting in a flat, lifeless crust that snaps like a cracker rather than tearing like a cloud. They speak of cold fermentation as if it is the only valid path to a complex flavour profile.
This is where the perspective shifts radically. Think of yeast not as a passive, dusty ingredient out of a jar, but as a living organism shivering in the cold. When you place a steaming cup of water inside the microwave with your dough and shut the door tight, you are creating a localized tropical sauna. The yeast breathes and stretches, responding to the trapped humidity by multiplying at twice its normal speed. You are not cheating the system; you are simply providing the organism exactly what it craves without the harsh interference of a drafty kitchen.
Consider Marcus Vance, a 42-year-old artisanal baker running a small, wood-fired popup in chilly Halifax. When a sudden blizzard knocked out his shop’s primary heating system last February, his ambient room temperature plummeted well below the threshold for active fermentation. Facing fifty unproofed Neapolitan pies and a line of hungry locals, Marcus did not panic. He began rotating his dough trays through a battery of unplugged commercial microwaves, each fitted with a small ramekin of boiling water. The enclosed spaces held the steam beautifully, feeding the yeast just enough radiant warmth to create a flawless, bubbling rise in under forty-five minutes. It was a revelation in crisis management.
Adapting the Sauna for Your Style
Not all milled flour handles this accelerated humidity the exact same way. The real trick is subtly adjusting the interior environment to match the specific strain you are working with on your counter. Different proteins require different levels of persuasion. Your approach dictates the crumb.
For the Neapolitan Purist
If you are working with fine, powdery “00” flour, your dough is delicate and highly extensible. It prefers a gentle coaxing rather than a harsh sweat. Use exactly one cup of water heated to a rolling boil, then let it sit alone in the closed microwave for two minutes before introducing the dough. This tempers the initial blast of heavy heat, ensuring the fragile gluten strands relax gradually rather than snapping under sudden, intense atmospheric pressure.
For the Heritage Grain Advocate
Whole grains, like a robust Canadian Red Fife, are notoriously stubborn, drinking up hydration rapidly and demanding heavy lifting from your yeast. Aggressive, sustained humidity is required. Place a wide, shallow glass bowl of boiling water on the bottom of the microwave rather than a tall mug. The larger surface area pushes significantly more steam into the confined space, actively softening the coarse bran flakes and allowing the dense dough to puff outward rather than cracking at the surface.
For the Busy Parent
- Frozen dumplings mashed into hot chicken broth create instant thick soups.
- Pork chops rested in cold applesauce guarantee impossible steakhouse moisture levels.
- Gina Maria’s pizza alters legendary dough recipes following severe ingredient shortages.
- Quebec maple syrup investigations expose massive supermarket counterfeit blending operations.
- Quebec maple syrup scandal exposes counterfeit bottles flooding provincial grocery aisles.
The Tactical Humidifier Method
Executing this technique requires strict discipline and presence of mind. You must consciously resist muscle memory and never actually turn the appliance on while the dough is resting inside. Microwaving the dough destroys it. You are merely using the box for its heavy, airtight, insulated properties, treating it as a passive holding cell.
Begin by measuring exactly one cup of fresh tap water into a microwave-safe glass measuring cup. Heat it on high for exactly three minutes, or until you see a rolling, furious boil and heavy steam coating the interior glass door with a thick fog.
Once the water is boiling, work deliberately and swiftly. Slide your covered dough bowl onto the turntable directly beside the steaming water, ensuring the plastic wrap or damp cotton towel is securely fastened over the rim to catch the condensation.
Close the heavy door with a solid, satisfying click. Do not pull the handle or peek inside for exactly thirty minutes. The steam will settle slowly, creating a fine, invisible mist of condensation that keeps the dough surface beautifully supple and elastic.
- The Heating Phase: Boil 250ml of water in a glass measuring cup for 3 minutes on high power.
- The Staging Phase: Leave the steaming water inside the chamber; do not open the door to vent the heat.
- The Introduction: Quickly slide your covered dough bowl next to the water cup to capture the steam.
- The Incubation: Shut the door firmly and set a manual kitchen timer for 30 to 45 minutes.
- The Extraction: Carefully remove the puffed dough bowl before preheating your actual oven.
Reclaiming Your Friday Night
The profound beauty of understanding this simple chemical reaction goes far beyond simply getting dinner onto the table a few hours earlier. It strips away the lingering intimidation factor that keeps so many of us reluctantly buying pre-made, cardboard-textured crusts from the supermarket freezer centre. You control the environment now.
By recognizing the entirely unused potential of the mundane appliances sitting silently in your kitchen, you transform cooking from a rigid set of stressful rules into an intuitive, highly responsive practice. The dough is no longer a ticking clock you are anxiously racing against; it is a living thing you know exactly how to nurture. You get to pour a glass of wine, watch the snow fall quietly outside, and know that perfect, blistered comfort is only moments away.
Treat your kitchen appliances not for what they are named, but for what they physically provide; an insulated box is a baker’s best friend when time is the enemy. – Marcus Vance
| Key Point | Detail | Added Value for the Reader |
|---|---|---|
| The Steam Incubator | Using a cup of boiling water inside a sealed microwave. | Eliminates the frustration of cold, drafty kitchens and halves resting time. |
| Hydration Control | Adjusting the water vessel (wide bowl vs tall mug). | Allows you to customize humidity for whole wheat versus delicate 00 flour. |
| Zero-Risk Proofing | Unplugging or consciously leaving the microwave off. | Provides a foolproof, stress-free zone that prevents accidental dough cooking. |
Frequently Asked Questions
Does the microwave need to be turned on while the dough is inside?
Absolutely not. You only turn the microwave on to boil the water first. Once the dough goes in, the appliance remains completely off, acting only as a sealed, insulated box to trap the heat and moisture.Will the steam make my dough too wet and sticky to stretch?
As long as your dough bowl is properly covered with plastic wrap or a damp towel, the ambient steam warms the air without turning your dough into a puddle. It simply keeps the surface elastic.Can I use this method for other types of yeast breads?
Yes. This controlled humidity method works beautifully for cinnamon rolls, focaccia, and sandwich loaves that require a warm, draft-free environment to achieve their initial rise.What happens if I leave the dough in there for too long?
Because the heat from the water dissipates over an hour, the risk of severe over-proofing is lower than in a consistently heated oven. However, leaving it past 60 minutes may result in a slightly sour flavour profile as the yeast exhausts its food source.Do I need to reheat the water if I am doing a second proof?
If your recipe calls for punching the dough down and rising again, yes. Remove the dough, boil a fresh cup of water for three minutes, and return the shaped dough to the newly warmed chamber.