The morning light hits the kitchen counter, casting long, cold shadows over your bag of all-purpose flour. You stare at the heavy metal rolling pin, feeling that familiar knot of anxiety tighten in your chest. Making pastry from scratch carries a quiet dread, a looming fear that your warm hands will melt the fat before the dough even hits the pie tin. We are taught that a proper crust requires a delicate, almost nervous touch, breathing through a pillow of flour without disturbing the peace.
You expect a battle against time and temperature, rushing to incorporate the fat while terrified of overworking the gluten. The standard advice tells you to cut the butter into pea-sized cubes, painstakingly pinching them into the flour until your fingers ache and the mixture turns to greasy sand. It feels less like baking and more like defusing a small, butter-filled explosive on your countertop. You measure the ice water drop by drop, praying that the bottom layer of your pie won’t turn out soggy, dense, or tough enough to bend a fork.
But step into the prep area of a high-volume bakery before dawn, and you won’t see pastry chefs hovering nervously over bowls with tiny metal pastry blenders. The professional reality is surprisingly aggressive and remarkably simple. They do not coddle the dough, nor do they fear the warmth of their own hands ruining hours of prep work. The secret to an impeccably flaky bottom layer is not a gentle touch or a whispered prayer.
They rely on brutal cold and a common household tool you likely use for sharp cheddar cheese. The solution to your pastry anxiety is hiding in the darkest, coldest corner of your deep freeze, waiting to be violently shredded into submission.
The Box Grater Rebellion
We harbour a terrifying belief that perfect pastry dough must be carefully rolled, folded, and worried over. This myth treats the dough like fragile spun silk that will tear at the slightest provocation. In truth, building a flaky pie crust is closer to stacking a dry stone wall. You are relying on structural integrity and the sudden, violent expansion of trapped steam. You need rigid, cold architecture, not warm, overworked paste.
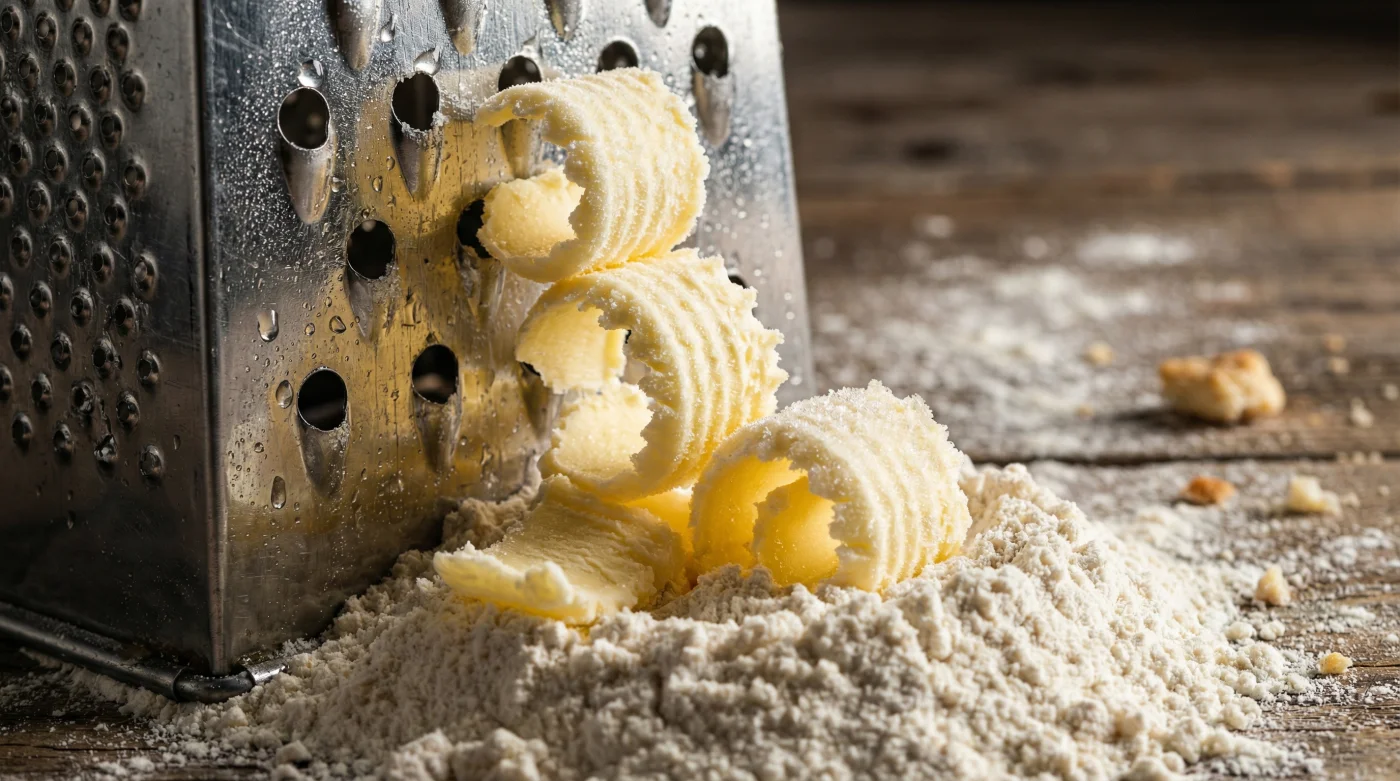
Shaving frozen butter blocks directly into the flour completely bypasses the danger zone of melting fat. Instead of mashing room-temperature butter into a paste, you are creating thousands of rigid, icy ribbons. These frozen shards coat themselves in flour, sitting securely suspended in the dry mix. When they finally hit the fierce heat of the oven, the water trapped inside the frozen butter flashes into steam, violently pushing the flour layers apart. You build perfect microscopic air pockets without ever needing to fold, fret, or laminate the dough.
Consider Arthur, a 58-year-old diner cook working just off the Trans-Canada Highway outside Calgary. For thirty years, his apple pies have sold out by noon, boasting a bottom crust so shattered and flaky it practically rings when tapped with a fork. Arthur doesn’t own a fancy food processor or a delicate wire pastry cutter. He doesn’t have the time to gently massage fat into flour while a diner full of hungry truckers waits for breakfast.
He pulls solid blocks of butter from the deep freeze, grabs a scarred metal box grater, and shreds the fat like he is making a massive batch of hash browns. He tosses the frozen curls into the flour with a fork, adds a splash of ice water, and turns out perfection in under five minutes. His secret is entirely about managing physical states, leaving the finesse to the oven. The frozen grate method guarantees a bottom layer sturdy enough to hold a mile-high mound of Northern Spy apples, yet delicate enough to shatter on the tongue.
Adapting the Frozen Shave
Not every kitchen environment behaves the same way, and your approach to the grated butter method can shift depending on your circumstances. The beauty of this technique is its rigid adaptability. Whether you are baking in a drafty farmhouse or a cramped, overheated apartment, you can modify the temperature variables to protect your icy butter ribbons.
Cold flour prevents early melting of the butter when working in standard environments. For the purist chasing the absolute pinnacle of flavour, stick to European-style butter with a higher fat content. You will want to place the mixing bowl and the flour itself in the freezer for twenty minutes before you begin. Chilled dry ingredients ensure those delicate butter ribbons remain completely distinct, acting as tiny thermal insulators until they reach the heat.
For the Humid Kitchen: Baking in the dead of a heavy Ontario summer poses a completely different threat. The ambient moisture in the heavy air will attempt to hydrate your flour before you even add a drop of water, and the room temperature will attack the butter the second it leaves the freezer.
Keep your grater insulated by wrapping the metal handle in a small dishcloth, preventing the heat of your palm from transferring down the metal. If the butter starts to slip in your grip, wrap the end you are holding in a small piece of parchment paper to block your body heat. Work in swift, deliberate motions.
For the Time-Starved Parent: You do not have to grate the butter on the exact day you intend to bake. The friction of everyday life often interrupts our best intentions in the kitchen. You can prep the architecture of your pie crust days in advance, completely removing the mess from your active baking session.
Shredding on a Sunday allows you to toss the icy curls lightly in a handful of flour so they do not clump together, storing them in a sealed container in the freezer. When you finally need to pull a pie crust together on a busy Wednesday evening, your fat is already prepped, properly chilled, and ready to pour directly into your mixing bowl.
The Tactical Toolkit
- Sliced cheese recall expands rapidly across Canada over severe bacterial contamination.
- Bacon strips brushed with cold water prevent curling during pan frying.
- French omelettes demand frozen butter cubes for perfectly creamy soft centers.
- Broccoli stems peeled and pickled create high-end zero-waste deli sandwich toppings.
- Fresh parsley fried in hot oil creates expensive translucent dinner garnishes.
Prepare your workspace fully before the butter ever leaves the freezer. Fill a glass with water and actual ice cubes, setting it aside so the temperature drops near zero. Once the butter is out, the clock starts ticking, and you do not want to be searching cupboards for a missing measuring spoon.
- Place your box grater in a wide, shallow bowl rather than a deep one, giving your hands room to move without restricting your angle.
- Grate the frozen butter using the largest teardrop holes on the grater, pressing firmly to yield long, continuous strands rather than tiny flakes.
- Stop halfway through to toss the freshly fallen butter curls in the flour, separating them before the friction of the grating process causes them to stick together in a massive clump.
- Drizzle your ice water over the mixture one tablespoon at a time, using a fork to gently lift and fluff the flour until it barely holds together when squeezed in your fist.
The Cold Reality Mechanics dictate specific physical benchmarks for success. Your butter must sit at roughly -18 Celsius, meaning it needs to be solidly frozen overnight, not just chilled for an hour. Once the dough is formed into a disc, your resting time in the fridge must be a strict minimum of 45 minutes before the rolling pin ever touches the surface.
Skipping the resting phase allows the gluten network to snap back like a rubber band, shrinking your crust violently in the pan and crushing the delicate suspension of those grated butter curls you just worked so hard to create.
Reclaiming Your Countertop
Mastering this single, physical detail shifts your entire relationship with baking. The dread of a soggy bottom layer or a tough, overworked crust evaporates the moment you choose to trust the raw physics of frozen fat. You no longer need to rely on luck, superstition, or some elusive baker’s touch to create something beautiful for your family.
Changing your physical approach to the very first step of the recipe frees you from the anxiety of the entire process. The kitchen stops being a place of stress and frantic temperature management. You are no longer fighting the ingredients; you are simply setting them up to succeed.
You can breathe easily, knowing the microscopic architecture of your dough is already secured before the oven door even opens. You have built something deeply resilient, entirely capable of carrying whatever heavy fruit, rich custard, or savoury filling you choose to pour inside. The pie crust is no longer a terrifying obstacle to overcome; it is a reliable, shattering foundation.
“You cannot force a pastry to be flaky through sheer willpower or nervous energy; you must aggressively build the cold architecture for the steam to do the heavy lifting in the oven.”
| Key Point | Detail | Added Value for the Reader |
|---|---|---|
| Frozen Butter Shaving | Using a standard box grater on a -18 Celsius butter block. | Completely eliminates the risk of melting fat with warm hands. |
| Microscopic Air Pockets | Frozen butter shreds remain distinctly separate in the flour matrix. | Creates guaranteed, professional flakiness without complex folding. |
| Flour Chilling | Placing dry ingredients and bowls in the freezer prior to mixing. | Prevents ambient room heat from softening the delicate butter ribbons. |
Frequently Asked Questions
Can I use stick margarine instead of butter for this grating technique?
Margarine has a significantly higher water content and entirely different freezing properties. While it can physically be grated, it will not create the same pronounced, flaky air pockets as pure butterfat.
Do I need to peel the entire butter wrapper back as I grate?
No, leave the foil or paper wrapper on the top half of the block. Use it as a protective thermal barrier against the heat of your palm, peeling it down slowly as you work through the butter.
What if my kitchen is extremely warm and the butter softens instantly?
Grate half the butter block, toss it in the flour, and place the entire bowl back into the freezer for ten minutes before pulling it out to grate the remaining half.
Why is my grated dough crumbling into dust when I try to roll it?
You likely need one more tablespoon of ice water, or the formed dough simply needs more resting time in the fridge so the flour can fully absorb and hydrate from the moisture provided.
Can I just grate the butter using the shredding disc on my food processor?
A food processor blade aggressively chops rather than cleanly shreds. While incredibly fast, the mechanical heat of the blade can smear the fat, failing to create the long, thin ribbons necessary for this specific structural method.