You pull the loaf from the oven. The kitchen smells heavy with toasted yeast and warm flour, a quiet comfort on a bitterly cold February morning. You slide the hot pan onto the stovetop, waiting for that familiar crackling sound as the bread cools. But when you tap the bottom of the loaf with your knuckles, you do not get that hollow, drum-like echo. Instead, you hear the dull thud of a soft crust.
You followed the recipe meticulously. You measured the water and flour by weight, monitored the room temperature, and you kneaded until your shoulders ached. You waited hours for the dough to rise, watching it double in size on the counter. Yet, the final bread lacks that glassy, shattering exterior you consistently find at the neighbourhood bakery. It looks pale, matte, and slightly tired, resembling a supermarket bun rather than an artisanal centrepiece.
The frustration is entirely normal, and it rarely has anything to do with your mixing technique or your choice of yeast. The secret to a bakery-quality crust is not a more expensive bag of heritage flour or a longer, more tedious proofing time. The missing element is a physical reaction, and the catalyst is sitting right now in the back of your freezer.
The Sauna Before the Sear
To get a crust that flakes and snaps like thin ice under a winter boot, you have to stop thinking of your oven as a dry, static furnace. The first ten minutes of the baking process dictate the entire physical personality of your bread. If the environment is intensely hot and dry, the exterior of the dough sets and hardens almost immediately.
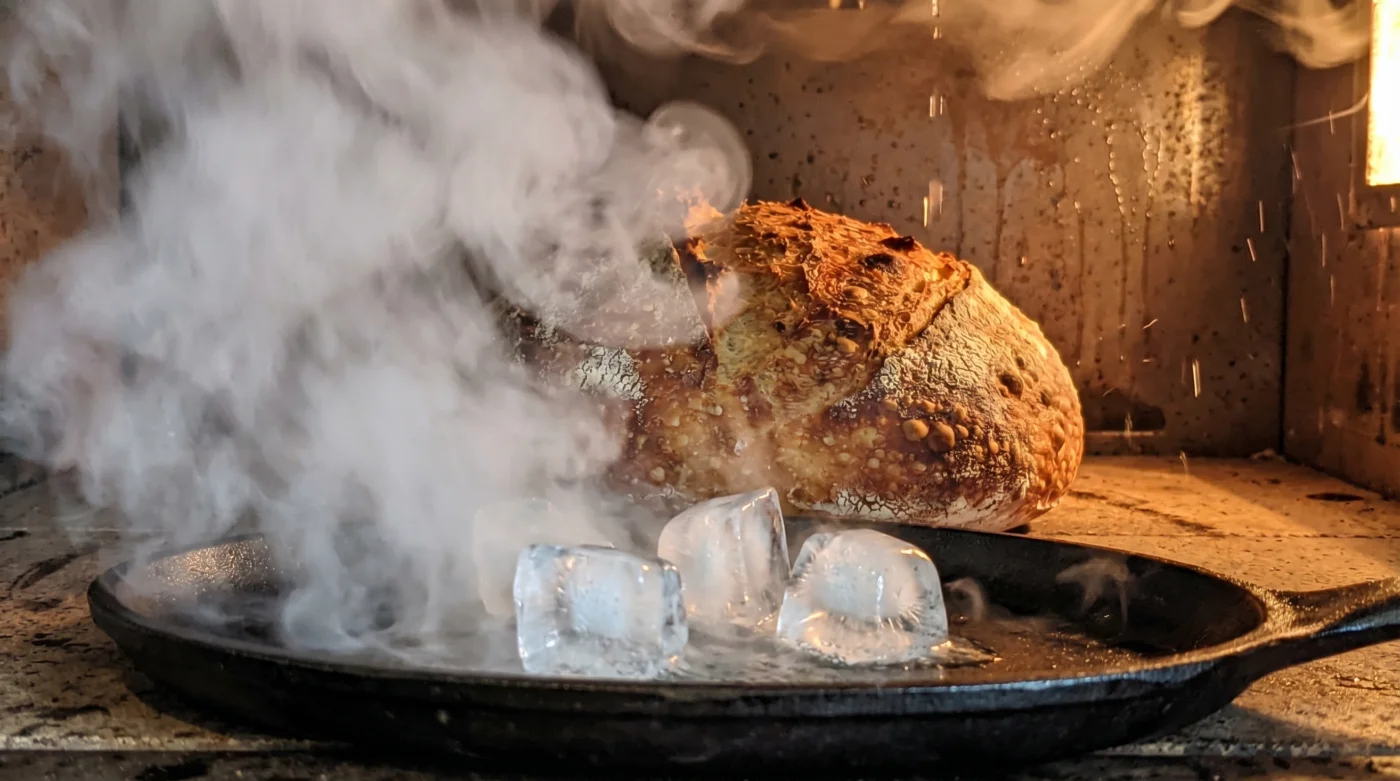
This premature hardening creates a rigid cage around the dough. As the internal moisture heats up and tries to expand, the hardened exterior forces the bread to tear in ugly, unpredictable ways. You need a protective layer of moisture to delay this setting. By tossing a handful of frozen cubes into a hot pan at the bottom of your oven, you create a slow-release cloud of vapour.
This continuous humidity delays the crust formation. The surface of the dough stays incredibly pliable, allowing the loaf to stretch and swell to its absolute maximum volume. The moisture settles delicately on the surface of the loaf, gelatinizing the raw starches. When the vapour finally dissipates after several minutes, those highly hydrated starches fry in the dry heat, creating a beautifully blistered, crackling shell.
Elias, a 58-year-old artisan baker who operates a drafty brick-and-mortar shop in downtown Halifax, understands this environmental rhythm better than anyone. A few winters ago, his multi-thousand-dollar commercial steam-injection oven broke down right before a busy holiday morning rush. With dozens of loaves fully proofed and ready to bake, he didn’t panic or cancel the orders. He simply grabbed a plastic bus bin full of ice cubes from the corner convenience store and threw them directly onto the hot oven floor.
"Steam from a kettle of hot water flashes off too fast in a standard home-style setup," he told me, leaning over a scarred wooden prep table dusted with rye flour. "Ice buys you a critical window of time. It melts slowly, then boils, giving the bread exactly seven minutes of grace before the dry heat completely takes over." It was a temporary survival tactic that saved his morning production, but for a home baker working with standard appliances, it is a permanent, reliable solution.
Tailoring the Freeze
Depending on your personal kitchen equipment, this simple addition adapts to your specific physical constraints. You do not need a heavy, expensive cast-iron pot to achieve professional, hearth-style results if you learn to manipulate the humidity correctly.
For the Sheet Pan Minimalist
If you bake your loaves free-form on a flat baking sheet, the oven environment is entirely open and highly susceptible to rapid moisture loss. Place a dark metal roasting pan on the lowest rack while the oven preheats to 230°C. When you slide your bread onto the centre rack, immediately drop six to eight ice cubes into the hot roasting pan below. The sudden drop in ambient temperature is negligible, but the sustained steam production is entirely transformative for the crust.
For the Dutch Oven Traditionalist
You already trap moisture natively by using a heavy cast-iron lid, but you can dramatically amplify the surface blistering. Slip a single, small ice cube under the edge of the parchment paper right before you secure the lid and load the pot into the oven. The immediate micro-burst of vapour within that confined space forces the crust to develop those tiny, highly sought-after bubbles that shatter beautifully when you finally cut into the cooled loaf.
For the Sourdough Skeptic
If you are baking a standard yeasted loaf or a simple, enriched sandwich bread, a softer crust is often preferred. You can still use this freezing method to encourage a better rise, but reduce the volume to just two small ice cubes. This provides exactly enough surface stretch for the dough to rise beautifully and symmetrically without building a thick, aggressive shell that might be too tough for a delicate sandwich.
The Tactical Drop
Applying this method requires a bit of organized speed and spatial awareness. You want to trap the resulting vapour inside the baking chamber, not let it escape harmlessly into your kitchen.
Keep your movements deliberate, calm, and quick. A truly remarkable crust is born in the first moments of intense heat.
- Place a heavy-duty roasting pan (strictly metal, never glass) on the bottom rack of your oven before you turn it on.
- Preheat the oven thoroughly to 230°C, giving the bottom pan at least thirty full minutes to absorb the intense radiant heat.
- Score the top of your dough with a sharp blade and smoothly slide it onto the centre rack.
- Quickly drop a generous handful of ice cubes directly into the bottom pan.
- Shut the oven door immediately and absolutely do not open it to peek for at least twenty minutes.
The Resonance of a Good Loaf
There is a profound, almost primitive satisfaction in slicing into a loaf of bread that fights back just a little bit. The audible sound of the crust cracking under the teeth of a serrated blade is the direct reward for your patience and your attention to detail. It turns a basic carbohydrate staple into the textural focal point of your entire meal.
When you stop fighting your basic kitchen equipment and start manipulating the baking environment, the process stops being a rigid set of unyielding instructions. It becomes a fluid, intuitive response to the elements at hand. You are no longer just mixing flour and water and hoping for the best; you are actively managing heat, time, and humidity to force the ingredients to behave exactly how you want them to.
The next time you prepare a loaf for a weekend dinner, skip the complicated spray bottles and the dangerous boiling water baths. Let a simple handful of frozen water do the heavy lifting, and listen closely for that hollow, perfect echo when it emerges from the heat.
"The crust is the signature of the baker; it tells the story of the oven before you even take a bite."
| Key Point | Detail | Added Value for the Reader |
|---|---|---|
| Delayed Setting | Moisture keeps the dough surface flexible. | Maximizes the size and shape of your bread. |
| Starch Gelatinization | Vapour hydrates the exterior flour. | Creates a glossy, shatter-crisp crust. |
| Safer Application | Ice melts slower than boiling water flashes. | Prevents severe steam burns when closing the oven. |
Common Baking Curiosities
Can I use a glass dish for the ice?
Absolutely not. The extreme temperature shift will shatter glass or ceramic. Always use a dark metal or cast-iron pan.Will this drop my oven temperature too much?
The thermal mass of a fully preheated oven easily absorbs the minor temperature dip caused by a few frozen cubes.How many cubes should I use?
Six to eight standard cubes are perfect for an open-bake on a baking sheet. Use just one if baking inside a closed Dutch oven.Do I need to remove the water later?
No, the ice will melt and fully evaporate within the first ten to fifteen minutes, leaving the pan dry for the final baking phase.Does this work for gluten-free bread?
Yes, steam benefits the exterior starch gelatinization of gluten-free flours just as effectively as traditional wheat.