The refrigerator crisper drawer is a graveyard of good intentions. You buy a bushy, fragrant bunch of basil or a delicate cluster of dill just to garnish a Tuesday night pasta or a Sunday roast. You use a fraction of it, tying the plastic bag in a tight knot and promising yourself you will make pesto or a salad dressing later in the week.
A few days later, that vibrant green begins to slump. The leaves turn translucent, weeping a bruised, dark liquid into the bottom of the bag. It feels like a minor personal failure, tossing another half-bunch of thyme into the compost bin before the first snow has even settled on the driveway.
We usually try to fight this decay with frantic, high-effort preservation methods. We wrap stems in damp paper towels, stand them in water glasses in the fridge door like fragile bouquets, or hang them upside down to dry until they crumble into flavorless dust. All of these methods require constant monitoring.
But the secret to arresting time isn’t found in careful botanical preservation. It relies on a cheap, everyday fat. You can suspend that bright, raw flavour almost indefinitely by trapping it in cold oil. This is the kitchen fix that turns an impending chore into an effortless habit.
The Amber of the Kitchen
Think of a prehistoric insect perfectly preserved in tree sap. That is exactly the environment you are creating for your leftover sage and rosemary. When you put a naked leaf in the freezer, the water inside its cells expands into jagged ice crystals. The delicate cell walls rupture violently. When thawed, you are left with a black, slimy mush that tastes vaguely of frostbite.
However, when you chop those leaves and drown them in everyday oil, you strip away their greatest enemy: oxygen. The fat acts as a protective shield against freezer burn, wrapping each chopped fragment in a heavy, impermeable jacket that wards off the harsh, minus-18-Celsius chill of your deep freeze.
This completely changes how you look at the wilted parsley sitting on your cutting board. Instead of a ticking clock demanding your immediate culinary attention, you see tomorrow’s dinner starter waiting patiently for its moment.
Consider the evening routine of Elias Thorne, a 42-year-old prep cook at a bustling midtown Toronto bistro. Every night after the dinner service ends and the stainless steel counters are scrubbed down, Elias gathers the orphaned sprigs of tarragon, chives, and oregano that didn’t make it to the plates. He doesn’t painstakingly dry them on racks. He aggressively chops the pile, sweeps it into standard ice cube trays, and floods the compartments with bulk cooking oil. By morning, those trays hold solid, jade-flecked pucks. When he builds a stew or pan-fries a steak the next afternoon, he just drops a frozen puck directly into the hot pan. It is a five-minute end-of-shift chore that eliminates food waste entirely.
Categorizing Your Green Assets
Not all plants behave the same under a layer of frost and fat. You have to categorize them properly to make sure they serve your future meals correctly. This requires no extra effort, just a basic understanding of plant structure.
For the woodsy aromatics like rosemary, thyme, sage, and oregano, this method is flawless. These sturdy, woody plants are built to withstand heat. When frozen in oil, they are ready to become the instant base for roasted chicken or a slow-simmered Sunday gravy. The oil melts, and the hardy leaves sizzle instantly, releasing their essential oils into the pan.
For the delicate finishers like basil, cilantro, mint, and dill, you need slightly more caution. These fragile leaves bruise easily and lose their bright, sharp notes if cooked too long. Freeze these in smaller increments. When it is time to use them, do not use them as a sauté base.
Instead, wait until your meal is entirely cooked. Drop them into hot broth right at the very end of cooking, or let a cube melt slowly over a warm bowl of cooked grains. The residual heat will thaw the oil and release the raw, punchy flavour without destroying the delicate leaf.
If you constantly crave heat in your cooking, you can take this method a step further. Do not just freeze the greens alone. Mix your chopped cilantro with diced jalapeños, grated ginger, or crushed garlic before pouring the oil. You are building custom, pre-portioned flavour makers that will save you ten minutes of chopping on a busy Wednesday night.
The Five-Minute Preservation Protocol
This requires no specialized gear, just a mindful shift in your cleanup routine. When you finish making your meal, do not shove the remaining bunch of greens back into the crisper drawer. Deal with it immediately while the cutting board is still out, protecting your culinary investments before they begin to wilt.
First, wash and aggressively dry your leaves. Water is the enemy in this process; any residual moisture will form ice crystals and degrade the fragile cellular structure of the plant. Use a salad spinner, or press them gently between clean, dry kitchen towels until they feel like paper.
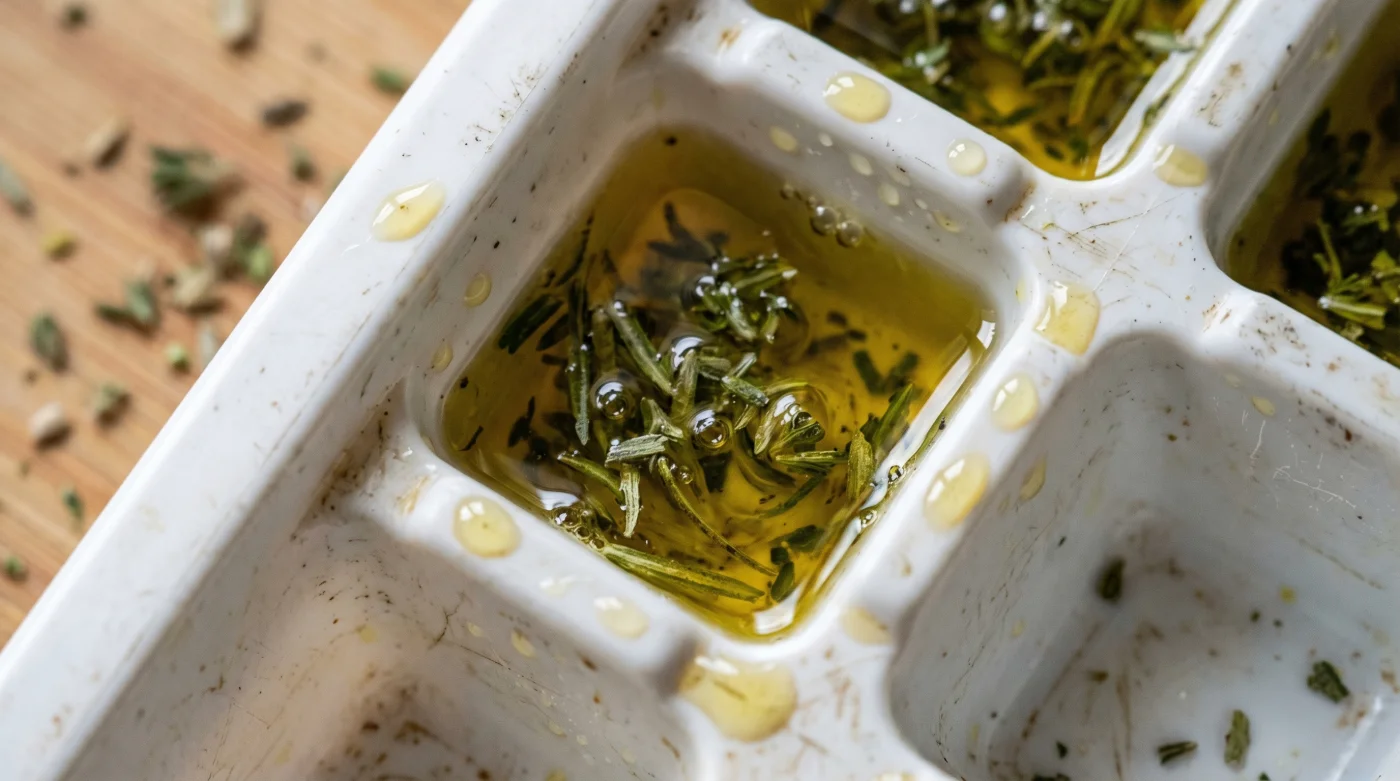
Chop the greens down to your preferred cooking size. Do not leave them whole. Pack the chopped pieces tightly into the wells of a silicone ice cube tray, filling each compartment about three-quarters of the way to the top. Do not overfill them, ensuring there is room for the fat.
- The Tray: Silicone ice cube trays are mandatory; their flexible bottoms make popping out frozen oil effortless.
- The Fat: A cheap, everyday olive oil is perfect. Save your expensive, cold-pressed finishing oils; freezing mutes their delicate floral notes.
- The Temperature: A standard home freezer set to minus-18 Celsius works perfectly.
- The Ratio: Aim for approximately one tablespoon of packed, chopped greens to two tablespoons of oil.
Pour the oil slowly over the packed compartments. Let it seep down into the tiny crevices between the leaves, ensuring every single green fragment is completely submerged below the surface.
Place the tray flat in the freezer. Once they are rock solid, which usually takes overnight, remove the tray. Immediately pop the frozen pucks out and transfer them to a resealable freezer bag or an airtight container. This frees up your tray and prevents the fat from absorbing ambient freezer odours like leftover chili or raw pastry dough.
Reclaiming Your Kitchen Economy
There is a deep, quiet satisfaction in opening your freezer door and seeing a stash of vibrant green cooking bases ready to deploy. It transforms the guilt of forgotten produce into a tangible, strategic advantage for your future self.
You no longer have to run to the grocer for a single sprig of rosemary in the dead of winter. You simply reach into the cold and pull out a cube of preserved summer. It is a tiny act of defiance against the rising cost of groceries and the inevitability of decay.
This simple habit does more than save a few dollars at the checkout line. It fundamentally shifts your relationship with kitchen waste, turning a frustrating, mundane detail into a reliable, effortless routine. The lazy fix, it turns out, is almost always the smartest one.
A kitchen runs not on the expensive ingredients you buy, but on the small, quiet habits that prevent you from throwing them away.
| Key Point | Detail | Added Value for the Reader |
|---|---|---|
| Moisture Control | Ensure leaves are completely dry before chopping. | Prevents icy freezer burn and maintains vibrant flavour. |
| Submersion | Leaves must be fully covered by the fat. | Stops oxygen exposure, preserving the bright green colour. |
| Storage Transfer | Move solid cubes to an airtight bag. | Frees up your trays and stops the absorption of freezer smells. |
Common Frustrations Solved
Can I use canola or vegetable oil instead? Yes, any neutral cooking fat works perfectly, though olive oil offers a richer base for most savoury cooking.
Will the herbs still be good for garnishing fresh salads? No, once thawed, the texture will be soft. These are strictly meant to be melted into hot dishes or whisked into warm dressings.
How long do these frozen pucks last? Kept in an airtight container, they will easily hold their sharp flavour for up to six months.
Do I need to thaw them before cooking? Absolutely not. Drop them directly from the cold freezer into your hot skillet or simmering soup.
Can I freeze butter this way? Yes, melted butter works beautifully, though it requires slightly more effort to melt, pour, and cool than liquid oil.