Picture a chilly Saturday morning in November. Frost clings to the edges of the windowpane, and the kitchen is quiet, save for the hum of the refrigerator and the rhythmic scrape of metal on glass. The air smells faintly of raw flour dust and cold fat. You stand over a heavy glass bowl, hands dusted in white, feeling the tension build in your wrists as you awkwardly mash a manual pastry blender into a stubborn lump of chilled dairy that refuses to yield.
The standard expectation is that pastry demands physical struggle, a battle of wills against warming temperatures and unyielding ingredients. You are told to cut the fat until it resembles coarse crumbs, constantly racing against the heat of your own palms and the creeping warmth of the room.
But professional kitchens do not operate on panic. Watch a seasoned baker prepare a morning run of galettes, and you will see a quiet efficiency that looks entirely effortless. They aren’t mashing or fighting the dough; they are building a fragile, temporary architecture out of simple ingredients.
The secret isn’t a stronger wrist or a colder room. It relies instead on a shift in physical mechanics, utilizing a common household tool to do the heavy lifting before the heat can even register on the butter block.
The Perspective Shift: The Architecture of Flakiness
Making pie dough is less like mixing a cake batter and more like shuffling a delicate, physical deck of cards. The ultimate goal is to keep the butter completely distinct from the flour matrix until the exact moment it hits the intense heat of a heavy oven, preserving the structural integrity of every single layer.
When you mash with a blender, you inadvertently smear the fat. It melds into the flour, creating a tender but ultimately crumbly texture rather than the shatteringly crisp layers you actually want to serve to your family.
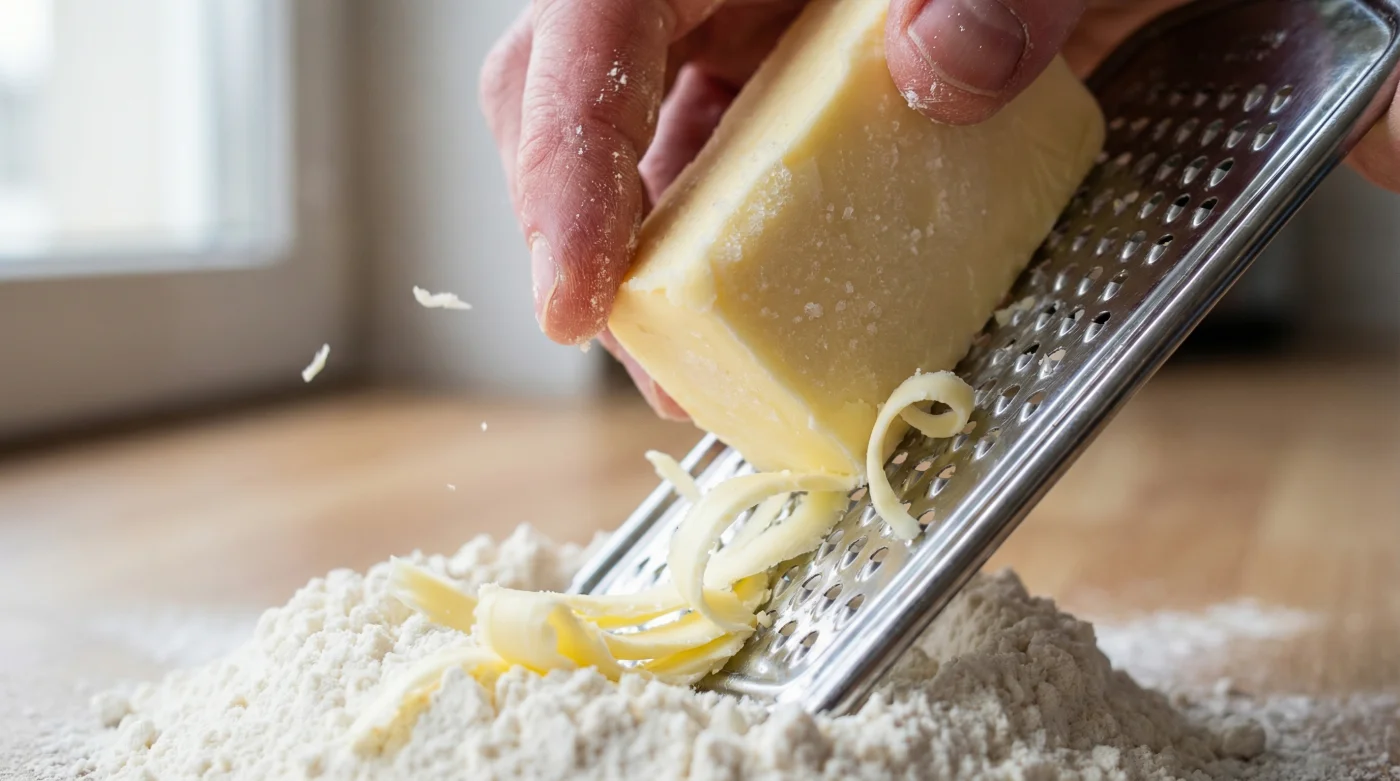
Think of grated, frozen butter as thousands of tiny, independent cold storage units. As they tumble into the flour, they coat themselves evenly. Each rigid shred acts as a physical spacer, keeping the sheets of flour distinct and separated from one another.
When baked, the water inside these untouched shreds turns to steam, pushing the flour upwards and leaving behind a crucial pocket of air. Your dough isn’t just mixed; it is systematically engineered to expand.
Elise, a 42-year-old pastry chef running a high-volume bakery in downtown Halifax, remembers the exact morning she abandoned the traditional cutting method. We had a rush order for two hundred Maritime blueberry hand pies, the kitchen was sweltering from the morning bread bake, and my wrists were absolutely screaming, she recalls. Desperate to save time, she threw blocks of unsalted dairy into the deep freeze, pulled out an industrial cheese grater, and shredded the fat directly into the chilled flour. The resulting bake was the most impossibly flaky crust the bakery had ever produced, effectively changing their entire production protocol overnight.
Adapting the Shards: Structural Variations
Not all pies demand the exact same structure. Depending on what you are preparing, the size of your butter shreds dictates the final bite, allowing you to tailor the crust to the specific filling you plan to use.
For the Hand-Pie Loyalist: If you are making something that needs to be held, like a traditional tourtiere hand pie or a Saskatoon berry pocket, you want a slightly tighter structure. Grating on the medium holes creates smaller steam pockets, giving you a sturdy crust that holds its shape.
This tighter matrix prevents the filling from bursting through the bottom layer. You get a shell that is sturdy but highly forgiving, refusing to disintegrate onto your lap after the very first bite.
For the Fruit Galette Purist: A rustic, open-faced tart needs maximum shatter to contrast the soft, jammy interior. Use the largest holes on your box grater to produce thick ribbons of frozen fat.
These heavy ribbons leave substantial gaps in the baking dough. They create a wide, open crumb capable of catching syrupy fruit juices without becoming soggy on the bottom pan.
For the Busy Parent: If you are throwing together a weeknight chicken pot pie, you rarely have time to let a dough chill for hours. Your priority is getting dinner on the table before the kids lose their patience.
In this scenario, raw speed is your best friend. Keep a pre-grated bag of butter in your freezer at all times. When hunger strikes, you just toss the frozen shreds directly into your dry mix, add ice water, and roll.
Mindful Application: The Cold Grating Protocol
This technique requires a little prep and a lot of restraint. You are aiming for absolutely zero melting during the assembly phase. Every action must be deliberate, swift, and respectful of the freezing temperatures present in the room.
Start by placing your box grater in the freezer alongside your butter for at least thirty minutes prior. Warm metal will immediately begin to soften the edges of the fat, defeating the entire purpose of the exercise.
Once everything is freezing cold, work with focused momentum. You want to handle the ingredients as little as physically possible, letting the cold tools do the interacting.
Following a strict tactical breakdown for flawless execution ensures you don’t ruin the temperature. Here are the precise movements you need to master:
- Hold the butter by its foil wrapper to prevent your body heat from transferring into the block.
- Grate swiftly and directly into the wide bowl of chilled flour.
- Use a wide-tined metal fork, rather than your warm fingers, to toss the shreds lightly until they are completely separated and coated in white dust.
- Drizzle in your ice water, one tablespoon at a time, just until the mixture holds together when gently pinched.
The tactile sensation should be loose and slightly shaggy. It should feel like breathing through a pillow, airy and light, rather than a dense paste.
Tactical Toolkit: Target butter temperature is -18 Celsius. Your primary tool is a standard stainless steel box grater. Your mixing implement should be a heavy metal fork chilled in the refrigerator.
The Bigger Picture: A Quieter Kitchen
There is a profound relief in abandoning a frustrating technique for a logical one. You stop fighting the dough and start working with the physical realities of the ingredients in front of you.
The anxiety surrounding the melting point simply vanishes entirely, replaced by a calm, methodical assembly. You know exactly what those frozen shards are doing inside the flour, and you trust the science of the steam to lift the pastry.
Baking stops being a rushed panic against the kitchen clock. It returns to what it should be: a quiet, focused craft that rewards observation and gentle handling.
When you pull that golden, blistered crust from the oven, the auditory crunch confirms your success. You aren’t surprised by the perfection; you expected it from the moment the first cold shred fell into the bowl.
The less you touch the dough, the more the oven can do the work for you.
| Key Point | Detail | Added Value for the Reader |
|---|---|---|
| Pastry Blender | Crushes butter into uneven clumps | Highlights why traditional methods create inconsistent, dense textures. |
| Food Processor | Spins at high speeds, risking over-mixing | Shows how mechanical heat can quickly turn a flaky crust into a tough shell. |
| Frozen Grating | Produces identical, ice-cold shards | Guarantees an even distribution of crucial steam pockets for guaranteed flakiness. |
Frequently Asked Questions
Do I need to freeze the flour too? Chilling the flour helps maintain the temperature, but freezing it isn’t strictly necessary; just keep it in a cool pantry.
Can I use salted butter for this grating method? Yes, but be sure to reduce the added salt in your dry mix recipe to maintain a proper flavour balance.
What if the butter starts melting while I grate? Pause immediately, put the bowl and the grater back in the freezer for ten minutes, and then resume.
Does this cold shredding technique work for biscuits? Perfectly. The exact same steam-pocket science applies to any layered pastry or scone you want to bake.
How long can I store pre-grated butter in the freezer? Up to three months in an airtight freezer bag, keeping it completely ready for immediate, stress-free use.